As an app developer, your app may need to provide new user content
And functions to keep them interested and customize the app experience to suit
Everyone’s needs, this is where remote configuration comes into play.
In summary, the Remote AppGallery Connect configuration can:
Change parameters through the cloud so that applications installed on the devices can periodically bring parameters updates from the cloud, do not require users to update the application and therefore accelerates the launch of the application.
This blog will show you how to use remote configuration to switch app
Features based on remote setting. Using Huawei Connect’s AppGallery we
Can leverage user features and remote conditions quickly and easily
Change parameters from the cloud.
As a quick comparison to the standard toolkit of Android developers. You can think of AppGallery Connect (AGC) as a Firebase equivalent. So when I talk about AGC console you can compare it to Firebase console. On both consoles you have access to features such as analytics, crash analysis, remote configuration, deep link push notifications, app notifications and much more !.
If you used Firebase Remote Config, the Huawei AGC Remote configuration is just as easy to use. If you have not used Firebase it does not matter! AGC Remote Configuration has an intuitive and simple API. God A sample application written for this blog post is available in open source on GitHub here.
With that .. let’s .. let’s start .. start!
Log in / Log in to AppGallery Connect
The first thing to do is to do it Register and / or log in To AppGallery Connect and verify your identity (can take up to 3 days, so plan ahead). Make sure you have a project and application that you can work on. If you have not done so before, You can read more about it here.
Once this is done, you will have access to a console that looks something like this:
Build an application that uses a remote configuration
We are going to build an app that uses a remote configuration to decide how to deploy its user interface. God AGC Academy has a video explanation here. This is a typical use case of a remote configuration, maybe more usually you would switch whole features, or change navigation paths to turn features on and off, but here to keep the guide simple, we will change some text and change the background color.
way Remote configuration There are a variety of functions that can be implemented like diverse filters, historical version management and real-time updates.
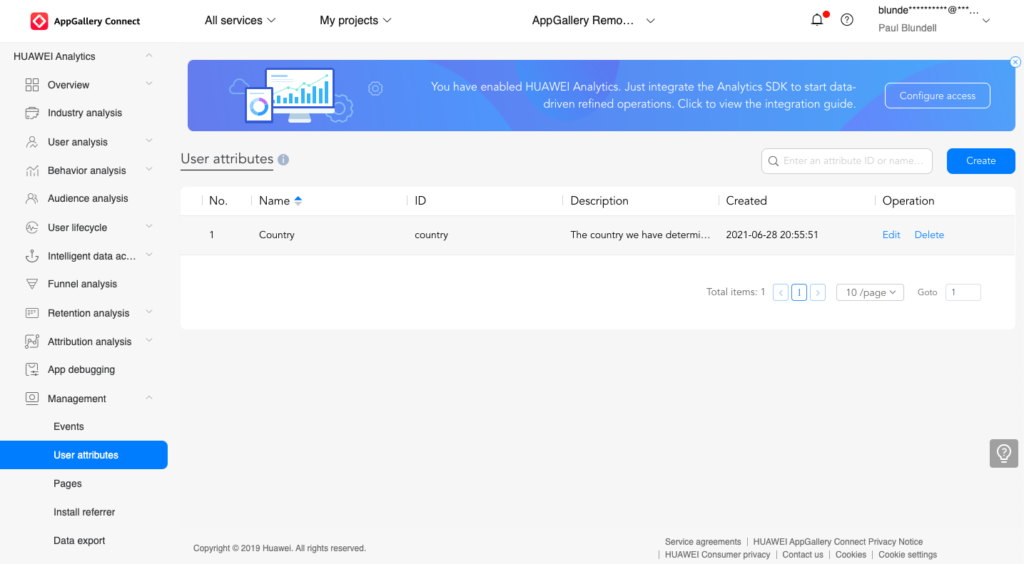
In analytics you have something called “user attributes” which are specific details about a user or user behavior that can help you differentiate and separate groups of users. AGC Analytics Has a built-in user feature called “Country / Region” and it allows you to group your users based on the IP address of the network hardware to which their last phone connected.
For example, if, say, you had a football app (football), you could show supporters that “they are from Scotland” the Scottish flag in your user interface on the main screen and those in England the English flag. It may have some IP endpoints along the Scotland / England border and that’s a problem, but a bigger problem would be Spanish people just visiting Scotland on holiday! We can fix the problem with something called custom user features.
Creating a custom user attribute for ‘Country’ will allow you to determine where the person is coming from based on something other than IP. In our demo we have EditText on the screen and you can type in a country name (in the real world scenario you would not type it, but you might derive it from the active SIM ISO or from the Device Set location, or maybe you can have the user select it from a list.
Define the settings from the remote configuration terminal
To create this custom user feature, go to AppGallery Connect console > Huawei Analytics> User Features and click ‘Create’. You will then be asked to enter an ID card, name and description. The name and description are for human purposes only, the ID will be used as a key so we can read / write this user feature from our app.
Set the following values:
- ID = “Country”
- Name = “Country”
- Description = “The country where we determined they are now.”
It will look something like this when you finish:
Now that we’ve created our custom user feature. We can use it to filter from our remote configuration.
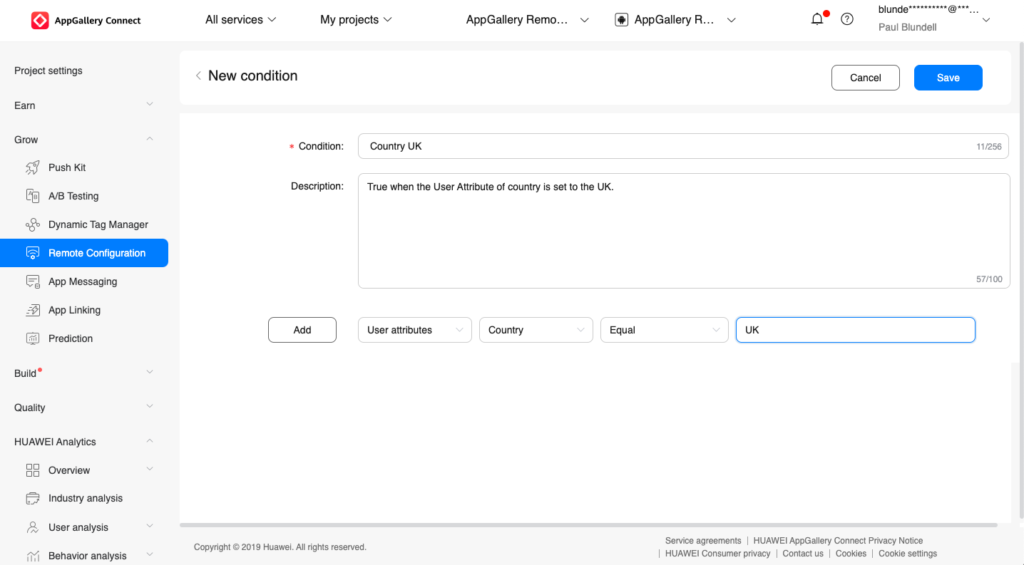
Go to again AppGallery Connect console > Grow> Remote Configuration, select the “Terms” tab and then click the “New Mode” button. You will then be asked to enter terms and description, below is a drop down menu where you can select the terms that will be used for the filter. Set the following values:
- Status = “United Kingdom”
- Description = “True when the country’s user attribute is set to UK.”
- Select = “User Attributes”> Country> Equal> “UK”
It will look something like this when you finish:
Click “Save” and navigate back to the “Parameters” tab.
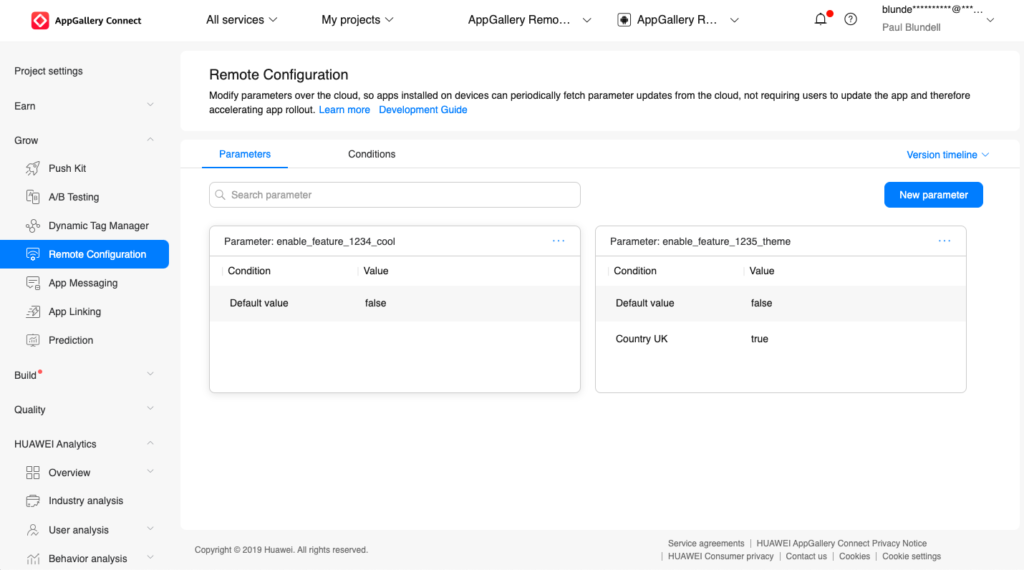
We are going to do two parameters, the first will be a standard remote configuration exchange that will be a Boolean group in a true or false terminal. The other will also be a Boolean arbitrator, however the truth or lie will be determined on the condition we have just done.
Click the “New Parameter” button to create these values. You will then be prompted to enter “parameter” which is the key name we will use to refer to this remote configuration parameter in our app. “Default value” that can take JSON or any type of primitive value (such as String, Int, etc.). And “description” to remember what this value is for.
For the first feature replacement, set the following values:
- Parameter = “enable_feature_1234_cool” (Try using a common naming method)
- Default value = “false”
- Description = “Correct to activate feature 1234. It will activate this cool new feature.”
To replace the second attribute, set the following values:
- Parameter = “enable_feature_1235_theme” (Try using a common naming method)
- Default value = “false”
- Description = “Correct to enable feature 1235. This will activate the theme feature.”
- Add Conditional Value> Status = “UK Country”, Value = “True”
It will look something like this when you finish:
Setting up and booting the app
Now that the entire console configuration is complete, we can continue creating the Android app! If you have not yet added the AppGallery Connect services to your Android app (by including the extension and the json file of the services), You can read more about it here. You may recognize this pattern. This is the same process you need to do the first time you add Firebase to your project. God Sample project Also configured, add the agconnect plugin to perform the json analysis of your configuration.
/build.gradle:
buildscript {
  repositories {
    ...
    maven {url 'https://developer.huawei.com/repo/'}
  }
}

buildscript {
  dependencies {
    ...
    classpath 'com.huawei.agconnect:agcp:1.5.2.300'
  }
}
/app/build.gradle:
dependencies {
  implementation 'com.huawei.agconnect:agconnect-core:1.5.2.300'
  ...
Create a remote configuration in the app
To use a remote configuration with user features, add the remote configuration and hi analytics depending on your project:
dependencies {
  ...
  implementation 'com.huawei.agconnect:agconnect-remoteconfig:1.5.2.300'
  implementation 'com.huawei.hms:hianalytics:6.0.0.300'
  ...
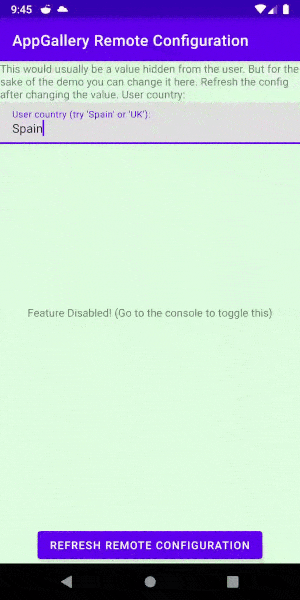
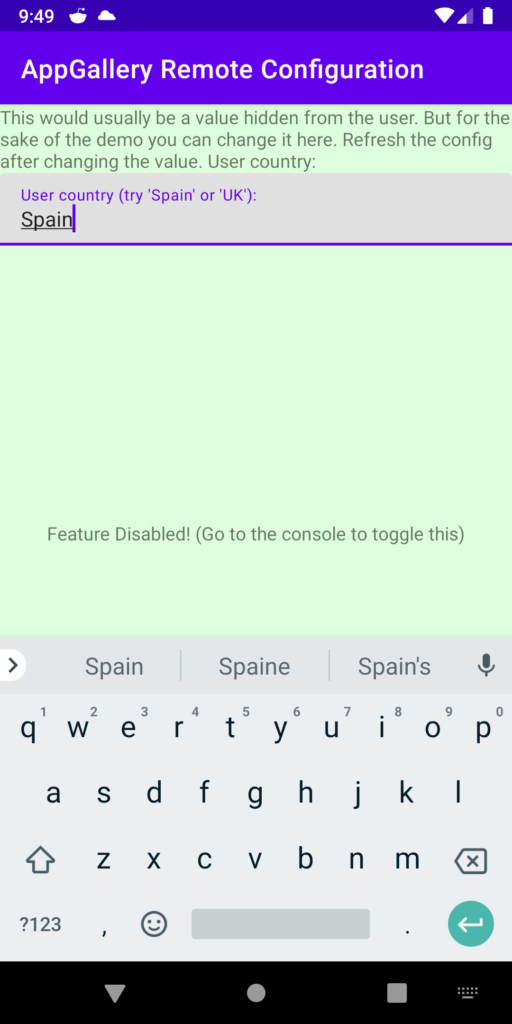
We then create a layout that allows us to view and edit the ‘Country’ user attribute. We add TextView to view the status of our 1234 feature, and a button to force a refresh of the currently remote configuration. We guarantee that the root view has an ID so we can change its background color.
<?xml version="1.0" encoding="utf-8"?>
<androidx.constraintlayout.widget.ConstraintLayout xmlns:android="http://schemas.android.com/apk/res/android"
    xmlns:app="http://schemas.android.com/apk/res-auto"
    android:id="@+id/content_main"
    android:layout_width="match_parent"
    android:layout_height="match_parent"
    app:layout_behavior="@string/appbar_scrolling_view_behavior">

    <TextView
        android:id="@+id/text_explanation"
        android:layout_width="wrap_content"
        android:layout_height="wrap_content"
        android:text="This would usually be a value hidden from the user. But for the sake of the demo you can change it here. Refresh the config after changing the value. User country:"
        app:layout_constraintLeft_toLeftOf="parent"
        app:layout_constraintRight_toRightOf="parent"
        app:layout_constraintTop_toTopOf="parent" />

    <com.google.android.material.textfield.TextInputLayout
        android:layout_width="match_parent"
        android:layout_height="wrap_content"
        android:hint="User country (try 'Spain' or 'UK'):"
        app:layout_constraintLeft_toLeftOf="parent"
        app:layout_constraintRight_toRightOf="parent"
        app:layout_constraintTop_toBottomOf="@id/text_explanation">

        <com.google.android.material.textfield.TextInputEditText
            android:id="@+id/edit_text_one"
            android:layout_width="match_parent"
            android:layout_height="wrap_content"
            android:text="Spain" />

    </com.google.android.material.textfield.TextInputLayout>

    <TextView
        android:id="@+id/text_view_one"
        android:layout_width="wrap_content"
        android:layout_height="wrap_content"
        app:layout_constraintBottom_toBottomOf="parent"
        app:layout_constraintLeft_toLeftOf="parent"
        app:layout_constraintRight_toRightOf="parent"
        app:layout_constraintTop_toTopOf="parent" />

    <Button
        android:id="@+id/button_one"
        android:layout_width="wrap_content"
        android:layout_height="wrap_content"
        android:onClick="onRefreshConfigClick"
        android:text="Refresh Remote Configuration"
        app:layout_constraintBottom_toBottomOf="parent"
        app:layout_constraintLeft_toLeftOf="parent"
        app:layout_constraintRight_toRightOf="parent" />

</androidx.constraintlayout.widget.ConstraintLayout>
To use the remote configuration we need a instance of AGConnectConfig (api doc), And to get / configure UserAttributes we use instance of HiAnalyticsInstance (api doc).
private lateinit var config: AGConnectConfig
private lateinit var analytics: HiAnalyticsInstance

override fun onCreate(savedInstanceState: Bundle?) {
    super.onCreate(savedInstanceState)
    config = AGConnectConfig.getInstance()
    analytics = HiAnalytics.getInstance(this)
    ...
When the user interface loads, we want EditText to display the user attribute of the current country, and when we press the refresh button, we want to save the country that was last typed. In the HiAnalyticsInstance API, UserAttribute is called UserProfile.
val currentCountry = analytics.getUserProfiles(false)["country"] ?: "Spain"

val editTextOne: EditText = findViewById(R.id.edit_text_one)
val currentCountry = editTextOne.text.toString()
// This sets the custom UserAttribute 'country' we created in the console
analytics.setUserProfile("country", currentCountry)
We now define the user country each time it changes, which means that if we bring up the remote configuration for “enable_feature_1235_theme” it will take into account which country they are in when it sends us true or false returns. For comparison, if we bring “enable_feature_1234_cool” it will always return ‘false’ because we set it explicitly in the console. This is how you bring these two Boolean values with a remote configuration:
val enableFeature = config.getValueAsBoolean("enable_feature_1234_cool")
val textView: TextView = findViewById(R.id.text_view_one)
if (enableFeature) {
    textView.text = "Feature Enabled! (Go to the console to toggle this)"
} else {
    textView.text = "Feature Disabled! (Go to the console to toggle this)"
}

val enableFeature1235 = config.getValueAsBoolean("enable_feature_1235_theme")
val contentMain: ViewGroup = findViewById(R.id.content_main)
if (enableFeature1235) {
 contentMain.setBackgroundColor(Color.parseColor("#22FF0000"))
 Toast.makeText(this, "Welcome to the UK!", Toast.LENGTH_SHORT).show()
} else {
 contentMain.setBackgroundColor(Color.parseColor("#2200FF00"))
 Toast.makeText(this, "Goodbye!", Toast.LENGTH_SHORT).show()
}
Finally forced to refresh the remote configuration while pressing the button. This is usually not necessary in a production app, as you will have a reasonable refresh period and the library for you will automatically check for updates to this configuration. But for demonstration purposes we want to force a refresh so we can see how state change is affecting.
config.fetch(0) // a value of 0 here is for DEBUGGING ONLY, delete for prod (giving a 12 hour refresh period)
    .addOnSuccessListener {
        config.apply(it)
        Log.d(TAG, "Applied")
        updateUIBasedOnRemoteConfig()
    }
Summary
that’s it! All the code you see above is available on GitHub here. You were able to use the AppGallery Connect console to create a remote configuration that takes custom user features into account, and use it to turn features on and off within your app. It supports SDK integration with just a few lines of code, you can easily access the service.
Moreover, AppGallery Connect services can be used for Android, Internet,
And high-speed cross-platform applications, including Flutter,
Cordoba, and React Native.
Full Disclosure Notice: I wrote this post in collaboration with Huawei and they are excited to announce AppGallery Connect Academy And encourage use AppGallery Connect.
Huawei AppGallery Connect has The academy for training here, With material available as written articles, documents as well as video explanations to help you get acquainted with these great features. There are many more, including AB Testing, In App Messaging, App Deep Linking and other ways to use the remote configuration.

